나의 토폴로지


UTM1


UTM 각 이더넷 IP 설정


Rocky 리눅스 1 ens 160
라우터 IP 주기


DHCP 주기
🐧Rocky (192.168.50.1)

[root@localhost ~]# dnf -y install dhcp-server
완료되었습니다!
[root@localhost ~]# vi /etc/dhcp/dhcpd.conf

[root@localhost ~]# systemctl restart dhcpd
[root@localhost ~]# systemctl status dhcpd

1층 Client PC 에서

DHCP Server (192.168.50.1)이 IP주소 할당해줌


할당은 받았는데 DHCP 주소를 고정할 것
📍DHCP 정적 할당
정적할당: 특정 시스템은 항상 같은 IP 주소를 할당 받도록 하는 설정
다시 Rocky (192.168.50.1)에서
[root@localhost ~]# vi /etc/dhcp/dhcpd.conf
하단에 추가한다
host client01 { → 별칭
hardware ethernet 00:0C:29:BF:1D:B4; → Client MAC 주소 (>ipconfig /all 물리적 주소 확인)
fixed-address 192.168.50.5; → Client에 할당할 IP 주소
}
host client02 {
hardware ethernet 00:0C:29:D1:F9:ED;
fixed-address 192.168.50.6;
}

[root@localhost ~]# systemctl restart dhcpd → 데몬 재구동
🪟Client win 10에서
192.168.50.5, 192.168.50.6 으로 IP 정적 할당 완료


DHCP Relay Agent
[root@localhost ~]# yum install dhcp* -y
완료되었습니다!
[root@localhost ~]# cp /lib/systemd/system/dhcrelay.service /etc/systemd/system
[root@localhost ~]# vim /etc/systemd/system/dhcrelay.service
[Service] 아래에
ExecStart=/usr/sbin/dhcrelay -d --no-pid [DHCP Server 주소]
ExecStart=/usr/sbin/dhcrelay -d --no-pid 192.168.50.1

[root@localhost ~]# systemctl enable dhcrelay.service
Created symlink /etc/systemd/system/multi-user.target.wants/dhcrelay.service → /etc/systemd/system/dhcrelay.service.
[root@localhost ~]# systemctl --system daemon-reload
[root@localhost ~]# systemctl --system daemon-reexec
[root@localhost ~]# systemctl force-reload dhcrelay.service
[root@localhost ~]# systemctl restart dhcrelay.service
[root@localhost ~]# systemctl status dhcrelay.service
● dhcrelay.service - DHCP Relay Agent Daemon
Loaded: loaded (/etc/systemd/system/dhcrelay.service; enabled; vendor pres>
Active: active (running) since Mon 2024-03-25 11:14:39 KST; 13s ago
Docs: man:dhcrelay(8)
Main PID: 5742 (dhcrelay)
Status: "Dispatching packets..."
Tasks: 1 (limit: 10804)
Memory: 2.0M
CPU: 4ms
CGroup: /system.slice/dhcrelay.service
└─5742 /usr/sbin/dhcrelay -d --no-pid 192.168.50.1
DHCP_Ubuntu
https://itmessenger-365.tistory.com/6
root@ubuntu1:~# apt-get install isc-dhcp-server -y

root@ubuntu1:~# nano /etc/dhcp/dhcpd.conf

Ctrl w - A slightly ~ 서치 후에
아래 #으로 주석처리 된 것들 제거 후 DHCP를 통해서 뿌려줄 IP 대역을 준다

subnet [네트워크 대역] netmask [서브넷마스크]
range [네트워크 주소 범위 입력];
option subnet-mask [서브넷마스크];
option routers [게이트웨이 입력];
optioin broadcast-address [브로드캐스트 IP];
수정완료 후 Ctrl X - 저장할 거냐 물어보면 Y(Yes)
#systemctl enable isc-dhcp-server
#systemctl restart isc-dhcp-server
#systemctl status isc-dhcp-server
윈도우에서 확인해보면

DHCP_windows 2003
https://netdream.tistory.com/29


192.168.100.37은 제외한다
192.168.100.37~40 제외하고 싶으면 끝 IP 주소에 192.168.100.40을 입력한다


DHCP 서버의 Gateway 주소 입력
192.168.100.254

DNS 서버: 168.126.63.1 혹은 8.8.8.8
WINS 서버 패스

활성화
DHCP 정적할당
🪟시작 - 관리도구 - DHCP

예약 우클릭 - 새 예약


MAC주소 00-0C-29-60-2D-4D는 192.168.100.10으로 정적할당한다
win2003 (DHCP)의 IP 주소↓
VMnet9번으로 변경

🖥️Client PC에서
IP 자동할당 및 VMnet9번으로 설정
>ipconfig /all

192.168.100.10으로 예약 할당

동적할당
UTM - DHCP 주기


Client PC 에서
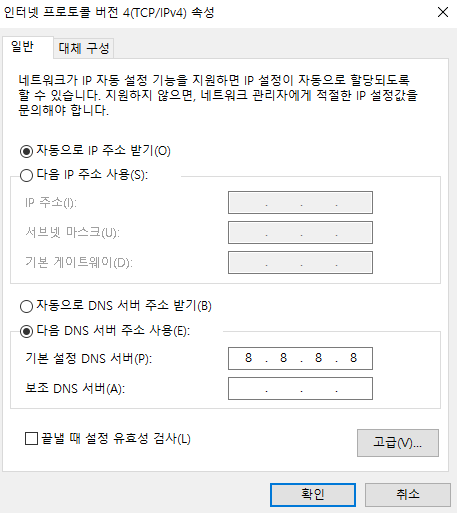
DHCP server로부터 자동으로 주소를 할당받을 수 있게끔 설정한다
>ipconfig /all 로 확인해보면
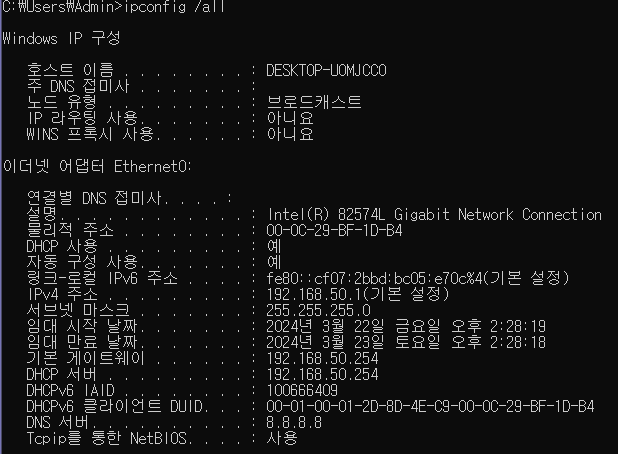
192.168.50.254로부터 주소를 자동으로 할당받았다
Samba Server
[root@localhost ~]# dnf -y install samba
[root@localhost ~]# mkdir /smbshare
[root@localhost ~]# groupadd sambaGroup
[root@localhost ~]# chgrp sambaGroup /smbshare
[root@localhost ~]# chmod 770 /smbshare
[root@localhost ~]# usermod -G sambaGroup rocky
[root@localhost ~]# smbpasswd -a rocky
New SMB password: aa159123!
Retype new SMB password:
Added user rocky.
[root@localhost ~]# vi /etc/samba/smb.conf
/global 서치 후
workgroup = WORKGROUP → 윈도우 기본 작업 그룹명으로 변경. 하단에
unix charset = UTF-8 → 문자 인코딩
map to guest = Bad User → 인증 없이 접속 허용

가장 하단에 아래 내용 추가
[smbshare]
path = /smbshare → 공유 디렉토리
writable = yes → 쓰기 허용
guest ok = no → 게스트 거부
create mask = 0777 → 파일 전체 접근 허용
directory mask = 0777 → 디렉토리 전체 접근 허용
valid users = @sambaGroup → sambaGroup 소속 사용자만 허용

[root@localhost ~]# testparm → 설정내용 확인
데몬 재구동 및 확인
[root@localhost ~]# systemctl restart smb nmb
[root@localhost ~]# systemctl status smb nmb
● smb.service - Samba SMB Daemon
Loaded: loaded (/usr/lib/systemd/system/smb.service; disabled; vendor pres>
Active: active (running) since Sat 2024-03-23 09:46:18 EDT; 3s ago
Docs: man:smbd(8)
man:samba(7)
man:smb.conf(5)
Client PC에서
탐색기
₩₩[samba server ip address]₩[공유 디렉토리 이름]
₩₩192.168.50.2₩smbshare

samba 그룹 이름 입력
samba group PW: aa159123!

생성 완료
Samba server에서 확인
[root@localhost ~]# ls /smbshare
'1F IT Server Room'

VLAN 설정
VLAN Virtual Local Area Network
물리적으로 분리되지 않은 여러 개의 네트워크 장치를 논리적으로 분리하는 기술
하나의 스위치에서 여러 개의 VLAN을 생성하여 네트워크 트래픽을 분리할 수 있다
VLAN은 물리적 네트워크 구조를 변경하지 않고도 네트워크르 분할할 수 있어 관리 및 보안을 향상시키는 데 사용된다
ex. 회사 네트워크에서 부서 별로 VLAN을 설정하여 서로 다른 부서 간의 트래픽이 격리 되도록 할 수 있다


Console창을 열어서
SW1#conf t
SW1 (config)#vlan 10
SW1 (config-vlan)#name V10
#exit
SW1 (config)#vlan 20
SW1 (config-vlan)#name V20
#exit
SW1 (config)#int fa1/0
SW1 (config-if)#switchport mode access
SW1 (config-if)#siwthcport access vlan 10
#exit
SW1 (config)#int fa1/1
SW1 (config-if)#switchport mode access
SW1 (config-if)#switchcport access vlan 20
SW1(config)#int fa1/15
SW1(config-if)#switchport mode trunk
SW1(config-if)#switchport trunk allowed vlan add 10
SW1(config-if)#switchport trunk allowed vlan add 20
SW1(config-if)#end


#show vlan-sw br

fa1/0은 VLAN10
fa1/1는 VLAN20
#show run


라우터 Inter VLAN 설정
R2(config)#int fa 2/0.10
R2(config-subif)#no shut
R2(config-subif)#encap
R2(config-subif)#encapsulation dot1q 10
R2(config-subif)#ip add 192.168.100.254 255.255.255.0
R2(config-subif)#exit

R2(config)#int fa 2/0.20
R2(config-subif)#no shut
R2(config-subif)#encap
R2(config-subif)#encapsulation dot1q 20
R2(config-subif)#ip add 192.168.110.254 255.255.255.0
R2(config-subif)#end
R2#wr
Building configuration...
[OK]
R2#
R2#show run

Router OSPF 설정
R2#conf t
R2(config)#router ospf 1
R2(config-router)#network 192.168.100.0 0.0.0.255 area 10
R2(config-router)#network 192.168.110.0 0.0.0.255 area 10
R2(config-router)#end
R2#wr
Building configuration...
[OK]
R2#show ip route
OSPF 안하고 UTM에 Static NAT설정할 것

#show run


ping이 안됐던 이유는 FastEthernet 2.0에 shutdown 되어 있어서 안됐음
Inter VLAN 설정
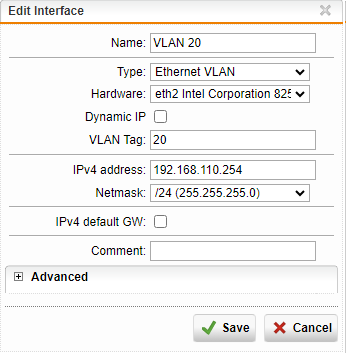
UTM에서 Interfaces & Routing - Interfaces - ➕New Interface...

| Edit Interface | |
| Name: VLAN 10 Type: Ethernet VLAN Hardware: eth2 VLAN Tag: 10 IP Address: 192.168.100.254 /24 |
Name: VLAN 20 Type: Ethernet VLAN Hardware: eth2 VLAN Tag: 20 IP Address: 192.168.110.254 /24 |

Web Filtering: VLAN 10 (192.168.100.0 /24)
VLAN 20 (192.168.110.0 /24)
#ifconfig

NAT
UTM: NAT-PAT


Interfaces & Routing - Additional Address - ➕New Additional Address...

Network Protection - NAT - Masquerading - ➕New Masquerading Rule...


UDP Tunneling

UTM 정책

VPN
Virtual Private Network
가상 사설 네트워크를 의미
인터넷 연결과 개인 정보를 보호
VPN은 데이터가 지나가는 암호화된 터널을 만들고 사용자의 IP 주소를 숨겨 온라인 익명성을 보장
설정순서
VPN으로 연결할 상대방의 터널 정보 (Remote Gateway)
VPN으로 연결할 Local 터널 정보 (Connections)
https:[UTM IP주소]:4444
https:// 192.168.135.1:4444
1. VPN 상대방 정보 입력 (Remote Gateway)
Site to Site VPN - IPsec - Remote Gateway - ➕New Remote Gateway...

Name: 본사
Gateway Type
Gateway: Host 35.15.3.13 본사 UTM eth0의 IP 주소 추가
Autentication Type: Preshared Key
Key: 123456
Remote networks: 192.168.30.0 /24 Network
본사 인트라넷에 접속할 네트워크 대역 설정
2. 내 정보 입력
Site to Site VPN - IPsec - Connections

Name: 해외지사
Remote gateway: 본사 (35.15.3.13)
Local interface: EXT
Policy: AES-128 대칭키 방식 적용
Local Networks: 192.168.50.0 /24
Automatic firewall rules 체크


VPN 접속 확인


DNS 주소 변경: 192.168.30.4
192.168.110.1에서
ping 192.168.30.3

#nslookup 으로 확인


사이트 접속 완료
'☁︎클라우드 > 일자별' 카테고리의 다른 글
| 240412 DAY 67 (0) | 2024.04.15 |
|---|---|
| 240411 DAY 66 (0) | 2024.04.15 |
| 240320 DAY 50 (0) | 2024.03.21 |
| 240318 DAY 48 (0) | 2024.03.19 |
| 240315 DAY 47 (0) | 2024.03.17 |


